Free: Secure IoT Remote Access (P2P SSH, Mac & Pi Guide)
Are you struggling with unreliable and complex IoT connections that leave your data vulnerable? The solution lies in establishing secure, direct peer-to-peer (P2P) connections to your remote IoT devices using SSH, particularly on devices like your Mac or Raspberry Pi. This approach offers a robust, cost-effective, and, yes, often free pathway to secure remote access and control.
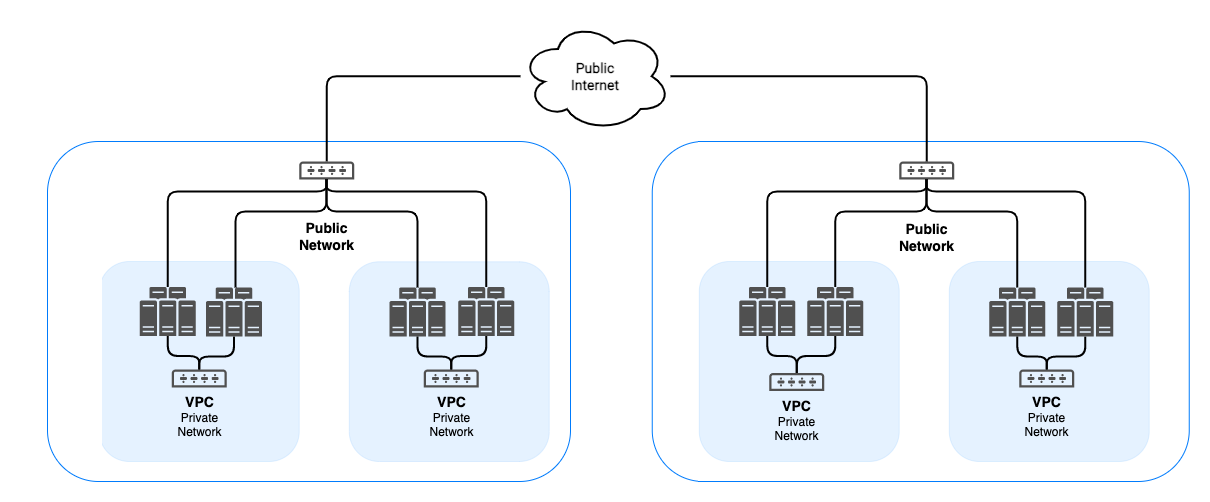
The core problem with many IoT deployments is their reliance on centralized cloud services or intricate network configurations, both of which can introduce single points of failure and potential security vulnerabilities. Imagine a scenario where a critical sensor in a remote agricultural setting fails to transmit data because of a temporary cloud outage. The consequences could be significant crop loss. Similarly, a security camera system relying on a vulnerable cloud platform could be susceptible to unauthorized access and data breaches. By employing a P2P SSH connection, you bypass these intermediaries and establish a direct, encrypted tunnel between your device and the IoT device, giving you unparalleled control and security.
Consider, for example, the need to remotely manage and update software on a series of Raspberry Pi-based weather stations deployed across a vast geographical area. Traditional methods might involve exposing these devices to the open internet, creating a significant attack surface. However, with a P2P SSH setup, you can securely access each weather station individually, perform necessary maintenance, and ensure the integrity of the system, all without relying on vulnerable public services.
The ability to securely connect to remote IoT devices using P2P SSH is particularly relevant when dealing with sensitive data or critical infrastructure. Think about the remote monitoring of medical devices in a patient's home or the control of industrial machinery in a manufacturing plant. In these situations, the confidentiality and integrity of the data transmitted are paramount, and a direct, secure connection offers a significant advantage over less secure alternatives.
While the concept of P2P SSH might seem daunting to those unfamiliar with networking and security protocols, the reality is that the process has become increasingly accessible thanks to readily available software tools and online resources. The following section will illustrate how to configure and utilize P2P SSH connections to your IoT devices, focusing on Mac and Raspberry Pi platforms. We will also explore methods to automate the process, further simplifying the management of your IoT infrastructure.
| Topic | Information |
|---|---|
| Concept | Securely connecting remote IoT devices using P2P SSH offers a robust, cost-effective, and often free pathway to secure remote access and control. |
| Vulnerability | Many IoT deployments rely on centralized cloud services or intricate network configurations, introducing single points of failure and potential security vulnerabilities. |
| Solution | Employing a P2P SSH connection bypasses intermediaries, establishing a direct, encrypted tunnel between devices, enhancing control and security. |
| Example | Remotely managing and updating software on Raspberry Pi-based weather stations using P2P SSH ensures integrity without relying on vulnerable public services. |
| Relevance | Crucial when dealing with sensitive data or critical infrastructure, such as remote monitoring of medical devices or control of industrial machinery. |
| Accessibility | The process has become increasingly accessible due to readily available software tools and online resources. |
| Reference | Raspberry Pi Official Website |
Let's delve into the practical aspects of setting up a secure P2P SSH connection. Firstly, ensure that your IoT device, whether it's a Raspberry Pi or another embedded system, has an SSH server installed and configured. On Raspberry Pi, this typically involves enabling the SSH service through the `raspi-config` tool or by directly editing the SSH configuration file. For other devices, consult the manufacturer's documentation for specific instructions.
- Job Mccully Extreme Makeover Where Is He Now 2024 Update
- Hyungry Temp Replacement Ep 3 What Makes It Special
Once the SSH server is running on your IoT device, you need to establish a way to reach it from your Mac, even if the device is behind a NAT (Network Address Translation) firewall. This is where P2P techniques come into play. One common approach is to use a reverse SSH tunnel. A reverse SSH tunnel allows the IoT device to initiate a connection to your Mac, effectively punching a hole through the firewall and allowing you to connect back to the device through that tunnel.
To create a reverse SSH tunnel, you'll need a publicly accessible server to act as an intermediary. This server doesn't need to be particularly powerful, but it should have a stable internet connection and SSH access enabled. You can use a VPS (Virtual Private Server) from providers like DigitalOcean or AWS, or even a spare computer at home that is connected to the internet.
The command to establish the reverse SSH tunnel from your Raspberry Pi (or other IoT device) would look something like this:
ssh -R 2222:localhost:22 user@your_public_server_ipIn this command:
- `ssh` is the SSH client command.
- `-R 2222:localhost:22` specifies the reverse tunnel. It tells the Raspberry Pi to forward port 22 (the standard SSH port) on its `localhost` (itself) to port 2222 on the public server.
- `user@your_public_server_ip` is the username and IP address of your public server.
After executing this command on your Raspberry Pi, the connection to the public server will remain open. Now, on your Mac, you can connect to your Raspberry Pi by SSHing to `localhost` on port 2222 of the public server:
ssh -p 2222 user@localhostYou will be prompted for your username and password of your Raspberry Pi. Note that you need to run this command on the public server itself.
To connect from your Mac directly, first forward the port 2222 from the public server to your Mac, by running this command on your Mac:
ssh -L 2222:localhost:2222 user@your_public_server_ipNow you can connect your Raspberry Pi on your Mac by SSHing to `localhost` on port 2222 :
ssh -p 2222 pi@localhostThis command connects you to the Raspberry Pi, but with the port forwarded to the public server and then back to your Mac. This way you can connect your Raspberry Pi even if it is behind a firewall.
Keep in mind that the above commands are simplified examples. In a real-world deployment, you'll want to take additional steps to secure your SSH connections. These might include:
- Using SSH keys: Instead of relying on passwords, which can be vulnerable to brute-force attacks, use SSH keys for authentication. SSH keys provide a more secure way to verify the identity of the client.
- Disabling password authentication: Once you have SSH keys set up, disable password authentication in the SSH configuration file (`/etc/ssh/sshd_config`) to further harden your system.
- Using a strong passphrase for your SSH key: This adds an extra layer of security to your key.
- Setting up a firewall: Configure a firewall on both your Mac and your Raspberry Pi to limit access to only the necessary ports.
- Regularly updating your software: Keep your operating system, SSH server, and other software up to date to patch any security vulnerabilities.
Automating the process of establishing the reverse SSH tunnel is crucial for maintaining a reliable connection. You can achieve this by creating a systemd service on your Raspberry Pi that automatically starts the SSH tunnel on boot and restarts it if it fails. This ensures that the connection is always available, even after a power outage or network interruption.
To create a systemd service, create a new file named `reverse-ssh.service` in the `/etc/systemd/system/` directory with the following content:
[Unit]Description=Reverse SSH TunnelAfter=network.target[Service]User=piExecStart=/usr/bin/ssh -R 2222:localhost:22 user@your_public_server_ipRestart=on-failureRestartSec=5[Install]WantedBy=multi-user.targetReplace `user@your_public_server_ip` with the appropriate username and IP address of your public server. Also, ensure that the `User` parameter matches the username on your Raspberry Pi that will be executing the SSH command.
Once the file is created, enable and start the service:
sudo systemctl enable reverse-ssh.servicesudo systemctl start reverse-ssh.serviceYou can check the status of the service with:
sudo systemctl status reverse-ssh.serviceThis ensures that the reverse SSH tunnel is automatically established whenever the Raspberry Pi boots up, providing a persistent connection for remote access.
While a public server offers a convenient way to establish the reverse SSH tunnel, it's not the only option. Another approach is to use a dynamic DNS service. Dynamic DNS services allow you to assign a static hostname to your home network, even if your IP address changes. This can be useful if you don't want to rely on a public server and prefer to host the tunnel endpoint on your Mac at home.
Services like No-IP and DynDNS provide free or paid dynamic DNS services. After signing up for an account and installing their client software on your Mac, your hostname will be automatically updated whenever your IP address changes.
Then, you can use your Mac as the public server by forwarding the port from Mac to Raspberry Pi. However, this would expose your Mac to the internet directly, which is not recommended.
However, setting up dynamic DNS can be more complex than using a public server, as it requires configuring your router to forward the necessary ports and ensuring that your Mac is always running the dynamic DNS client software.
Another advanced technique for securely connecting to remote IoT devices is to use a VPN (Virtual Private Network). A VPN creates an encrypted tunnel between your device and a VPN server, allowing you to access resources on the same network as the VPN server as if you were physically connected to it.
You can set up a VPN server on your home network or use a commercial VPN service. Once the VPN is configured, you can connect your Mac and your Raspberry Pi to the VPN, creating a secure network between them. This allows you to access the Raspberry Pi directly using its local IP address on the VPN network, without exposing it to the open internet.
VPNs offer several advantages over reverse SSH tunnels. They provide a higher level of security, as all traffic between your devices is encrypted. They also simplify the process of accessing multiple devices on the same network, as you only need to establish one VPN connection. However, VPNs can be more complex to set up than reverse SSH tunnels, and they may introduce some performance overhead due to the encryption and routing involved.
Another consideration is the choice of SSH client on your Mac. While the built-in `ssh` command-line tool is perfectly functional, several graphical SSH clients offer additional features and ease of use. Some popular options include:
- Termius: Termius is a cross-platform SSH client with a clean and modern interface. It supports SSH keys, port forwarding, and other advanced features.
- iTerm2: iTerm2 is a powerful and customizable terminal emulator for macOS. It offers many features not found in the built-in Terminal app, including multiple panes, split windows, and customizable themes.
- Royal TSX: Royal TSX is a comprehensive remote management tool that supports SSH, RDP, VNC, and other protocols. It's a good option if you need to manage a large number of remote connections.
The choice of SSH client is largely a matter of personal preference. Experiment with different options to find the one that best suits your needs.
Finally, it's important to regularly monitor your SSH connections for any suspicious activity. This can be done by examining the SSH logs on both your Mac and your Raspberry Pi. Look for failed login attempts, unusual connection patterns, or other anomalies that might indicate a security breach.
Tools like `fail2ban` can be used to automatically block IP addresses that exhibit suspicious behavior. `fail2ban` monitors log files for failed login attempts and other suspicious activity, and automatically adds firewall rules to block the offending IP addresses. This can help to prevent brute-force attacks and other security threats.
In conclusion, securely connecting to remote IoT devices using P2P SSH is a powerful technique that offers enhanced security, control, and flexibility. By employing reverse SSH tunnels, dynamic DNS services, VPNs, and other security measures, you can establish a robust and reliable connection to your IoT devices, regardless of their location or network configuration. Remember to prioritize security by using SSH keys, disabling password authentication, and regularly monitoring your SSH connections for any suspicious activity.
- Scott Jennings Autumn Stiff Marriage Net Worth Family
- Sondra Erickson Sondra Blust Erome The Intriguing Mix
Securely Connect Remote IoT P2P Raspberry Pi Download MAC A
Mastering IoT SSH P2P On Mac A Comprehensive Guide Without Extra Costs

Securely Connect Remote IoT P2P Raspberry Pi Download MAC A
